

Boxing Tips for Beginners: The Complete Beginner's Guide
Starting boxing can feel overwhelming when you're new to the sport. These boxing tips for beginners will help you learn the basics, improve your technique, and choose the right boxing equipment. Whether your goal is fitness, self-defence, or competitive boxing, understanding the fundamentals will help you progress faster and train safely.
How to Start Boxing as a Beginner
Step 1:
Learn the Basic Boxing Stance

Boxing stance - lower body
-
Hips: Turn slightly sideways, not square to your opponent. Keep them relaxed and centered between your feet.
-
Feet: Put your lead foot in front and rear foot behind, about shoulder-width apart (not in a straight line).
-
Stance Length: Feet should be about one comfortable walking step apart front-to-back.
-
Weight: Keep it balanced between both legs (roughly 50/50).
-
Knees: Slightly bent and relaxed, never locked straight.
-
Heels: Stay light on your feet. The back heel is often slightly raised.
-
Overall Feel: Stable, balanced, and ready to move in any direction quickly.
Bonus Boxing tips for beginners:
"Feet shoulder-width apart, knees bent, weight centered, back heel light."
Boxing stance - Upper body
-
Torso: Stay upright with a slight forward lean from the hips. Don't hunch over or lean too far forward.
-
Chest: Keep it relaxed and angled slightly sideways toward your opponent, not facing them square-on.
-
Shoulders: Keep them relaxed and slightly raised to help protect your chin. Avoid tensing them up.
-
Back: Stay straight and balanced, not rounded or arched.
-
Neck: Relaxed but firm enough to keep your head stable.
-
Head: Keep your chin tucked slightly down toward your chest. Don't look at the floor—keep your eyes on your opponent.
-
Eyes: Look straight ahead at your opponent's upper body, especially the chest and shoulders, to help spot punches and movement.
-
Overall Feel
-
Your upper body should feel:
-
Relaxed, not stiff.
-
Balanced over your hips.
-
Slightly angled rather than square-on.
-
Protected, with your chin tucked and shoulders helping shield it.
Bonus Beginner boxer tips:
"Stand tall, chest angled, shoulders relaxed, chin tucked, eyes forward."
Boxing stance - Arms & Hands
-
Hands: Keep both hands up near your cheeks or temples to protect your head.
-
Lead Hand: Slightly in front of your face, ready to jab and block.
-
Rear Hand: Close to your cheek, protecting the side of your face and jaw.
-
Elbows: Tucked in toward your ribs, not flared out to the sides.
-
Forearms: Positioned so they can help shield your face and body.
-
Fists: Closed but relaxed. Don't squeeze tightly until the moment you punch.
-
Arms: Stay relaxed and ready to move, not stiff or rigid.
-
Overall Feel
-
Your arms and hands should feel:
-
Protective first, offensive second.
-
Relaxed but ready.
-
Close enough to guard your head and body without blocking your own vision.
Bonus Boxing tips for beginners:
"Hands up, elbows in, fists relaxed, ready to jab and defend."

Step 2:
Learn the 1, 2, 3, 4 in Boxing
Learn the Jab (1)

Throwing the Jab - lower body
The jab starts from the ground up. As you throw the punch, push lightly off your rear foot while keeping your weight balanced. Your lead foot stays planted, and your hips rotate slightly to support the movement. Avoid leaning forward or lifting your feet off the floor, as this can affect balance and make you vulnerable to counter punches. A strong jab comes from proper foot positioning, balance, and efficient weight transfer rather than arm strength alone.
Key Points:
-
Stay balanced with feet shoulder-width apart.
-
Push gently from the rear foot.
-
Keep the lead foot planted.
-
Rotate the hips slightly.
-
Transfer weight smoothly without overreaching.
-
Return to your stance immediately after the jab.
Throwing the Jab - Upper body
The upper body should remain relaxed and controlled when throwing a jab. Start with your hands up in a proper guard position and extend your lead arm straight towards the target. As the punch travels, rotate your lead shoulder slightly forward to protect your chin while keeping your rear hand close to your face for defence. Avoid dropping your hands or overextending your arm, as this can leave you open to counter punches. Once the jab lands, quickly retract your arm and return to your guard position.
Key Points:
-
Keep your hands up at all times.
-
Extend the lead arm in a straight line.
-
Rotate the lead shoulder to protect the chin.
-
Keep the rear hand guarding the face.
-
Stay relaxed and avoid tensing up.
-
Snap the jab back quickly after impact.
Practise these Boxing basics for beginners until they feel natural and flow.
Learn the Back Hand (2)
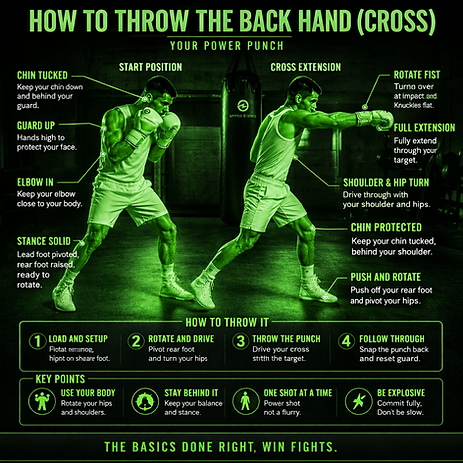
Throwing the Back Hand - lower body
The back hand (cross) starts with a strong base from your lower body. Push off your rear foot and rotate your back hip forward as your rear heel lifts slightly off the ground. Your weight shifts from the back leg into the front leg in a controlled motion, while your front foot stays planted for stability. Keep your stance balanced throughout so you don’t overcommit or fall forward after the punch.
Key Points:
-
Push off the rear foot to generate power.
-
Rotate the hips and rear leg forward.
-
Allow the rear heel to lift naturally.
-
Keep the front foot planted for balance.
-
Shift weight smoothly from back to front.
-
Stay grounded to maintain control after the punch.
Throwing the Back Hand - Upper body
The upper body is where most of the visible mechanics of the cross happen, but it only works properly when it stays controlled and aligned. As you throw the back hand, your rear arm travels in a straight line toward the target while your shoulder rotates forward. This shoulder rotation is important because it adds reach, protects your chin, and helps generate power without needing to “push” the punch. Your chin should stay slightly tucked behind your lead shoulder as you extend.
At the same time, your lead hand stays high and active in guard position to protect your face. Your torso rotates naturally with the punch, but you should avoid overreaching or leaning your head past your front knee. Once the punch lands, the rear hand should snap straight back to your guard position quickly so you’re ready for the next movement or counter.
Key Points for this Boxing techniques for beginners:
-
Extend the rear arm straight toward the target.
-
Rotate the rear shoulder forward for power and chin protection.
-
Keep the lead hand high in guard position.
-
Keep your chin tucked behind the lead shoulder.
-
Avoid overreaching or leaning forward.
-
Return the rear hand quickly to guard after the punch.
Learn the Lead Hook (3)

Throwing the Lead Hook - lower body
The lead hook is powered by sharp rotation from the lower body rather than forward movement. Start by keeping your feet grounded and your stance stable. As you throw the hook, pivot your lead foot slightly so your heel turns outward, allowing your hips and torso to rotate together. This rotation is what generates the power in the punch.
Your weight stays balanced between both legs, but there is a slight shift into the lead leg as you rotate. Avoid stepping or lunging into the hook, as this will reduce balance and make the punch easier to counter. The movement should feel compact, explosive, and controlled, with your base staying strong throughout the rotation.
Key Points:
-
Keep your feet planted and stance stable.
-
Pivot the lead foot to allow hip rotation.
-
Rotate hips and torso together for power.
-
Maintain balance between both legs.
-
Slight weight shift into the lead side is natural.
-
Avoid stepping or lunging into the punch.
Throwing the Lead Hook - Upper body
The upper body is responsible for shaping and directing the lead hook, but it must stay compact and controlled. As you throw the hook, your lead arm bends at roughly a 90-degree angle, forming a tight line from elbow to fist. The punch travels in a short horizontal arc toward the target rather than extending straight out, which helps maintain power at close range.
At the same time, your torso rotates with the punch, driving the shoulder forward while keeping your chin tucked behind it for protection. Your rear hand should stay high in guard position to protect your face. Avoid overextending the arm or dropping the opposite hand, as this leaves openings for counters. After impact, snap the hook back quickly to your guard position so you remain balanced and ready.
Key Points:
-
Keep the lead arm bent at roughly 90 degrees.
-
Throw the hook in a short, tight arc.
-
Rotate the torso and lead shoulder together.
-
Keep your chin tucked behind the lead shoulder.
-
Maintain rear hand in a high guard position.
-
Retract quickly back to guard after the punch.
Learn the Rear Hook (4)

Throwing the Rear Hook - lower body
The rear hook is powered by strong rotation from the lower body rather than forward motion. Start from a solid, balanced stance with your weight evenly distributed. As you throw the punch, pivot your rear foot so the heel turns outward, allowing your hips to rotate fully into the punch. This hip rotation is the main source of power for the rear hook.
Your weight shifts slightly toward the lead leg as you rotate, but you should stay grounded and avoid overcommitting your balance forward. Both knees stay soft and stable to support the turning motion. Do not step into the punch or lean excessively—keep the movement tight so you can recover quickly back into your stance.
Key Points:
-
Keep a stable, balanced stance.
-
Pivot the rear foot to allow hip rotation.
-
Rotate hips fully to generate power.
-
Shift weight slightly toward the lead leg.
-
Keep knees soft for balance and control.
-
Avoid stepping or leaning into the punch.
Throwing the Lead Hook - Upper body
The upper body plays a key role in shaping the rear hook and keeping it both powerful and safe. As you throw the punch, your rear arm stays bent at roughly a 90-degree angle, forming a tight structure as it travels in a short horizontal arc toward the target. The motion should come from the rotation of your torso and shoulder, not from swinging the arm on its own.
Your rear shoulder drives forward as your torso turns, while your chin stays tucked behind the shoulder for protection. Your lead hand remains high in guard position to protect your face. Avoid overextending the arm or dropping your guard, as this can leave you open to counters. After landing the punch, quickly bring the rear hand back to your guard position to stay balanced and ready is the main pint to Learn boxing for beginners.
Key Points:
-
Keep the rear arm bent at roughly 90 degrees.
-
Use a tight horizontal arc for the punch.
-
Rotate the torso and rear shoulder together.
-
Keep chin tucked behind the rear shoulder.
-
Maintain lead hand in a high guard position.
-
Return quickly to guard after the punch.

Step 3:
Boxing Footwork
Boxing footwork ladder

Foot Work Ladder for Foot Coordination
A footwork ladder is a great tool for improving coordination, balance, and speed in boxing. The focus should be on light, controlled movement rather than rushing through the ladder. Stay on the balls of your feet, keep your guard up, and maintain a relaxed upper body while your lower body does the work. Every step should feel quick but precise, helping you build rhythm and better ring movement.
When combining footwork with punches, the goal is to stay balanced while transitioning between movement and striking. Avoid becoming flat-footed or losing your stance when punching—your feet should always support your hands.
Key Points:
-
Stay on the balls of your feet for quick movement.
-
Keep steps light, controlled, and rhythmic.
-
Maintain a proper boxing stance throughout.
-
Keep your guard up while moving.
-
Do not rush—focus on clean, accurate foot placement.
Foot Work Ladder with Punches
Once you are comfortable with basic ladder patterns, you can add punches to develop coordination between your feet and hands. As you move through the ladder, throw simple combinations like jab, cross, or jab–cross while maintaining balance. Each punch should land without disrupting your footwork rhythm.
The key is to avoid overcommitting your upper body while stepping. Your punches should flow naturally from your stance, not force your balance forward or off-centre. Reset your guard after every combination so you are always ready to move or defend.
Key Points:
-
Combine simple punches (jab, cross) with ladder steps.
-
Keep movements smooth and coordinated.
-
Maintain balance while punching and stepping.
-
Do not lean forward when throwing punches.
-
Reset guard position after each combination.
Slip and pivot

Boxing Slip and Pivot - Step by Step Guide
Slipping and pivoting are essential defensive boxing skills that help you avoid punches while creating a better angle to attack or escape. The goal is to move efficiently, stay balanced, and keep your eyes on your opponent at all times is a key point of these Boxing techniques for beginners.
Step 1: Start in Your Boxing Stance
Stand in a balanced boxing stance with your feet shoulder-width apart, knees slightly bent, and hands up in guard position. Keep your chin tucked and eyes focused on your opponent.
Step 2: Read the Incoming Punch
Watch your opponent's shoulders, hips, and gloves for signs that a punch is being thrown. Stay relaxed and avoid reacting too early.
Step 3: Slip the Punch
As the punch comes towards you, move your head slightly to the outside of the punch by bending your knees and rotating your upper body. The movement should be small and controlled—just enough to make the punch miss.
Step 4: Maintain Your Balance
Keep your feet planted and your weight centred. Avoid leaning excessively at the waist, as this can leave you off-balance and vulnerable to follow-up punches.
Step 5: Pivot Off
After slipping the punch, turn on the ball of your lead foot and rotate your body to create a new angle. Your rear foot follows naturally as you pivot. This movement takes you away from your opponent's centre line and puts you in a safer position.
Step 6: Reset Your Stance
Once you have pivoted, return to a balanced boxing stance with your hands up and your feet underneath you. You should be ready to attack, defend, or move again immediately.
Key Points:
-
Keep slips small and controlled.
-
Bend the knees rather than bending at the waist.
-
Stay balanced throughout the movement.
-
Pivot on the ball of the foot.
-
Keep your eyes on your opponent.
-
Return to your stance quickly.
Boxing L Step

Boxing L Step - Step by Step Guide
The L-Step is a fundamental boxing footwork technique used to create angles, avoid pressure, and move away from an opponent while staying in position to attack or defend. When performed correctly, your movement creates an "L" shape on the floor, helping you exit the centre line and reposition safely.
Step 1: Start in Your Boxing Stance
Stand in a balanced boxing stance with your feet shoulder-width apart, knees slightly bent, and hands up in guard position. Keep your weight evenly distributed and stay on the balls of your feet.
Step 2: Recognise the Pressure
Use the L-Step when your opponent is moving forward aggressively, cutting off the ring, or when you want to create a new angle after an exchange.
Step 3: Step Back with Your Lead Foot
Move your lead foot straight back a short distance. Keep the step controlled and avoid crossing your feet. This creates the first part of the "L" shape.
Step 4: Move Your Rear Foot Out to the Side
Immediately move your rear foot sideways, creating the second part of the "L". This takes you off your opponent's centre line and creates a new angle.
Step 5: Bring Your Lead Foot Back Into Position
Slide your lead foot into your normal boxing stance so your feet are once again shoulder-width apart and balanced.
Step 6: Stay Ready to Attack or Defend
Once you've completed the L-Step, keep your guard high and eyes on your opponent. From your new angle, you can jab, counter, pivot again, or continue moving.
Key Points:
-
Keep your feet underneath you throughout the movement.
-
Move in a smooth "L" pattern.
-
Stay on the balls of your feet.
-
Avoid crossing your feet.
-
Keep your guard up during the step.
-
Maintain visual contact with your opponent.
Step 4:
Best Home Boxing Workout
How to warm up in boxing

Skipping to warm up in boxing
Skipping (jump rope) is one of the best warm-ups in boxing because it directly develops the exact qualities a boxer needs in the ring: rhythm, footwork, conditioning, and coordination. It’s not just cardio — it’s boxing-specific movement training.
1. Builds Boxing Footwork & Rhythm
Skipping teaches you how to stay light on your feet, which is essential in boxing. You naturally learn:
-
Weight shifting between feet
-
Bounce rhythm (like in the ring)
-
Staying balanced while moving continuously
Good boxers don’t walk in the ring — they flow, and skipping builds that habit.
2. Improves Cardio Without Slowing You Down
Unlike long-distance running, skipping:
-
Keeps you light and explosive
-
Trains fast-twitch endurance (boxing pace)
-
Gets your heart rate up quickly without heavy legs
This is closer to how boxing actually feels in rounds.
3. Develops Coordination & Timing
Skipping forces your:
-
Hands and feet to work together
-
Timing to stay consistent
-
Brain to coordinate rhythm under fatigue
This transfers directly into punching combinations and movement.
Full body muscle stretches for boxing warm up
1. Neck & Upper Body Mobility (2 minutes)
Boxing = relaxed shoulders + loose head movement.
-
Slow neck rolls (clockwise + anti-clockwise) — 5 each way
-
Shoulder circles (big to small) — 10 forward, 10 backward
-
Arm swings across chest (hug motion) — 10 each arm
-
Elbow circles — 10 each direction
Focus: loosen tension, don’t force range
2. Shoulder & Punch Activation (2–3 minutes)
This wakes up punching muscles.
-
Arm circles (small → big) — 20 seconds each direction
-
Fast straight punches in air (light speed jabs) — 20–30 reps
-
Light resistance punches (slow-motion punches) — 10 each arm
-
Scapula push-ups (plank position, shrug shoulders) — 10 reps
3. Core & Spine Mobility (2–3 minutes)
Helps with rotation power and slipping punches.
-
Standing torso twists — 20 reps
-
Side bends (reach over head) — 10 each side
-
Cat-cow stretch (on hands/knees) — 8–10 reps
-
Standing hip-to-hip rotation (controlled) — 10 each side
4. Hips & Lower Body (3–4 minutes)
Footwork and power come from here.
-
Hip circles — 10 each direction
-
Walking lunges (slow + controlled) — 8 each leg
-
Leg swings (front to back) — 10 each leg
-
Leg swings (side to side) — 10 each leg
-
Bodyweight squats — 10 reps
Focus: loose hips = faster footwork
5. Ankles & Footwork Prep (2 minutes)
Essential for balance and movement.
-
Ankle circles — 10 each direction per foot
-
Calf raises — 15 reps
-
Light bouncing in boxing stance — 30–60 seconds
-
Step-slide footwork drill — 1 minute
Stay on the balls of your feet.
Main boxing workout tips for home

Shadow Boxing for beginners
1. Start with Stance + Movement (Feet First)
Before throwing punches, you must feel balanced and mobile.
Start moving:
-
Small steps forward and back
-
Side-to-side steps
-
Pivot on the lead foot
-
Stay light on the balls of your feet
Goal: be able to move without losing balance or crossing feet
Think: “glide, don’t stomp.”
2. Add Hip + Core Activation (Power Source)
Now start connecting your body.
Before punches, wake up your rotation:
Key idea:
Your punches don’t start in your arms — they start in your feet → hips → shoulders → fist
Think: “hips turn everything.”
3. Add Basic Punching (Slow and Controlled)
Now introduce simple punches while moving.
Start with:
-
Jab (lead hand)
-
Cross (rear hand)
-
1–2 combo (jab–cross)
Think: “hit and don’t admire.”
4. Add Flow (Punch + Move Continuously)
Now make it feel like boxing rhythm.
-
Keep moving constantly (never plant for long)
-
Mix speed: slow jab → fast 1–2 → move out
-
Change direction after combinations
-
Add basic footwork between punches
Think: “dance around the space.”
5. Now Imagine an Opponent (The Mental Shift)
This is where shadow boxing becomes real boxing.
Picture someone standing in front of you.
Now you must:
-
Keep distance (range control)
-
React to imaginary attacks
-
Stay defensive after every action
Start asking:
-
“What would they throw back?”
-
“Am I too close?”
-
“Am I open after my punch?”
This is where shadow boxing becomes skill training, not just movement
6. Add Defence (Slip, Block, Roll)
Now you’re reacting like there’s pressure coming back.
After every combo, add defence:
Defensive actions:
-
Slip left / right (small head movement)
-
Roll under hooks
-
High guard block
-
Step back to avoid punches
Example:
-
Jab → cross → slip right
-
Jab → cross → roll under imaginary hook
-
Step in → 1–2 → step out → guard up
Rule: Never finish a combo and stay still
Think: “attack → defend → reset."
7. Add Counters (Real Fighter Thinking)
Now you’re reacting, not just attacking.
Pretend they hit you first.
Example counters:
-
Slip jab → counter jab
-
Block cross → return cross
-
Roll hook → hook to body
Simple Beginner Round Structure (3 minutes)
If you want a routine:
Round 1: Movement + stance + light jab
Round 2: Basic combos + footwork
Round 3: Defence + imaginary opponent reactions
Head Speed Ball Boxing
A head speed ball (also called a reflex ball / double-end style head ball) is one of the best beginner tools for boxing — but only if you start simple. Most people struggle with it because they go too fast too soon.
1. Set It Up Properly First
Before you even punch it:
-
Adjust it so the ball sits roughly nose to forehead height
-
Make sure it swings freely without hitting your face constantly
-
Stand close enough that you can reach it with a small arm extension (not overreaching)
Beginner mistake: setting it too high or too fast.
2. 🧍 Start in a Good Boxing Stance
-
Feet shoulder width apart
-
Slight knee bend
-
Hands up (chin level)
-
Relaxed shoulders
-
Eyes focused on the ball, not your gloves
3. Punch Only (Jab First)
Do NOT start with combinations.
Begin with:
-
Light jab only
-
Slow rhythm
-
Tap the ball gently, don’t smash it
4. Find the Rhythm (Most Important Step)
Once comfortable:
-
Jab → wait → jab → wait
-
Let the ball swing naturally
-
Try to match its timing
5. Add the Cross (2-Punch Combo)
Once jab feels easy:
-
Jab → cross → reset
-
Keep punches straight and relaxed
-
Let hips rotate slightly on the cross
6. Add Head Movement (Beginner Defence)
Now start reacting slightly:
After each combo:
-
Slight slip left or right
-
Small step back
-
Reset stance
Think: “hit, move your head, reset.”
7. Progress to “Flow Mode”
Now you combine everything:
-
Jab to control rhythm
-
Cross when timing feels right
-
Light head movement after each punch
-
Stay relaxed and in control
A good beginner round looks like:
-
Jab… jab… cross… slip… jab… reset…
Not speed — flow and control
Using a Boxing Bag Beginners
Round Structure (Core Workout)
Do 3-minute rounds / 1-minute rest
Start with 4–6 rounds total
ROUND 1 – Technique Only (Jab Round)
Focus: distance + accuracy
-
Jab only (no power)
-
Step in when you punch
-
Step out after each jab
-
Keep hands relaxed
Simple rhythm:
-
Jab → reset → jab → reset
Goal: learn distance control
ROUND 2 – 1–2 Basics (Jab–Cross)
Focus: straight punches + hip rotation
-
Jab → Cross
-
Step with jab, rotate with cross
-
Return hands to guard every time
Don’t rush — clean 1–2 only
Think: “snap, rotate, reset.”
ROUND 3 – Add Movement
Focus: punch + footwork
-
1–2 → step left
-
1–2 → step right
-
Jab while moving forward/back
Goal: don’t stay in one spot
Think: “hit and move.”
ROUND 4 – Basic Combinations
Now add variety:
-
Jab → Cross → Jab
-
Jab → Jab → Cross
-
Jab → Cross → Step out
Keep punches straight and controlled
ROUND 5 – Defence Introduction
Start imagining return punches:
After every combo:
-
Step back
-
Slight slip left/right
-
High guard reset
Example:
-
1–2 → slip → reset
-
Jab → cross → step back
Goal: don’t admire your punches
Think: “punch, defend, reset.”
ROUND 6 – Beginner Flow Round (Light Freestyle)
Put it all together:
-
Jab to find range
-
1–2 combinations
-
Light movement around bag
-
Small head movement after combos
Stay relaxed — no power punching yet
Step 5:
How to Wrap Hands for Boxing
Beginners Guide to using your Hand Wraps

Wrapping the wrist, knuckles and fingers with hand wraps
Step-by-Step Hand Wrapping Guide
1. Secure the Loop Around Your Thumb
-
Put the loop over your thumb
-
Make sure the wrap rolls off the top of your hand (not underneath)
The roll should go across the back of your hand first
2. Wrap Around the Wrist (Support Base)
-
Wrap around your wrist 2–3 times
-
Keep it snug but not tight
-
This is your foundation for wrist support
Think: “strong wrist = safe punch”
3. Wrap Around the Knuckles
-
Bring the wrap across the back of your hand
-
Wrap across your knuckles 2–3 times
Make sure:
-
Knuckles are covered evenly
-
Wrap sits comfortably (not bunched up)
This protects your punching surface
4. Wrap Between Fingers (Stability Step)
Now go between your fingers:
-
From knuckles → between pinky and ring finger → back around wrist
-
Then repeat between ring/middle finger
-
Then middle/index finger
Don’t pull too tight — just secure spacing
5. Go Back to Knuckles
-
After finger loops, return to knuckles
-
Wrap over them again 1–2 times
This locks everything in place
6. Finish Back at the Wrist
-
Wrap around wrist again 2–3 times
-
Make sure everything feels secure
-
No pressure points or numbness
7. Secure the Velcro
-
Fasten the wrap firmly
-
Open and close your hand to test comfort
-
Adjust if too tight or loose
-
How It Should Feel
A properly wrapped hand should feel:
-
Secure around the wrist
-
Cushioned on the knuckles
-
Comfortable when making a fist
-
Not numb or restricted
If it hurts or tingles, it’s too tight — redo it


